

Troubleshoot device connectivity in Jira Service Desk
In this guide, you’ll learn how to create automations in Jira Service Desk to help your team troubleshoot device connectivity using the emnify REST API. You’ll create three automations:
- Fetch current device and SIM statuses - Retrieve the current status of the device and SIM card associated with the issue and add a comment.
- Reset connectivity - Reset the device’s connectivity and comment on the issue.
- Get connectivity status - Fetch the current connectivity status of the device and comment on the issue.
Prerequisites
Before you start, make sure you have the following:
- A Jira Service Desk account
- An emnify account with at least one device and assigned SIM
- A valid application token associated with your emnify Workspace. You can create a new application token in the emnify Portal or the emnify REST API.
You also need a custom field for your SIM identifier in your Jira Service Desk project. To create this field, follow the instructions in the next section.
Create a custom field for your SIM identifier
All of the automations in this guide rely on a SIM identifier to retrieve data from the emnify REST API. To access the identifier in Jira Service Desk, create a custom field.
Your team should be familiar with this identifier and use it commonly. It also needs to be a value available for filtering in the List Endpoints API call.
Devices are called “endpoints” in the emnify REST API.
For example, you can use:
- eUICC Identifier (EID)
- Integrated Circuit Card Identifier (ICCID) with or without the final Luhn checksum digit
- International Mobile Equipment Identity (IMEI)
This guide uses the ICCID without the final Luhn checksum digit.
Follow the Atlassian Support documentation to create a new custom field named ICCID. Choose Short text (plain text only) for the field type instead of Number, as punctuation can cause issues in subsequent API calls.
Describe the field so that your team knows what it’s used for. The following is an example description for the ICCID field that includes links to the emnify glossary:
Finally, configure the issue view so the custom field is visible on your issues.

Create an automation to fetch current device and SIM statuses
Automation rules in Jira allow you to perform actions based on specific triggers and set criteria. To help your team understand the condition of a device and SIM card, you can create an automation rule that fetches the current statuses from the emnify REST API and adds a comment to the issue.
Step 1: Set up the trigger and conditions
To start, choose a trigger that initiates the automation and determines when the rule is run. In this case, the rule should run when an issue is created or updated. This guide uses the Issue created trigger.
You also want to set up a condition for each automation to ensure the rule only runs when the required SIM identifier is present.
Step 2: Generate an authentication token for the emnify REST API
Next, you need an action to execute when your rule is triggered and the condition passes successfully.
The first action uses your application token and the Retrieve Authentication Token call to generate a JSON Web Token (JWT) auth_token that authenticates further requests to the emnify REST API.
This API path has a rate limit of 100 requests per IP in a 5-minute window. For more information, see Rate limits.
Add the Send web request action and configure the fields as follows:
-
Web request URL -
https://cdn.emnify.net/api/v1/authenticate -
HTTP method - POST
-
Web request body - Select Custom data then add the following JSON payload:
-
Select Delay execution of subsequent rule actions until we’ve received a response for this web request. Alternatively, you can continue running the rule and set up error handling.
-
Headers - Insert
Content-Typeas a Key and addapplication/jsonas the respective Value.
The response contains the auth_token you’ll use to authenticate further requests.
See Retrieve Authentication Token in the emnify documentation for more details about the response structure and examples.
Because this automation requires multiple calls to the emnify REST API, you also need to store the auth_token as a variable.
Creating a variable saves a smart value as a semantic name that you can use in other actions or conditions within this rule.
Add a Create variable action, then configure the fields as follows:
- Variable name -
authToken - Smart value -
{{webhookResponse.body.auth_token}}
The authentication token is now stored in the {{authToken}} variable for future use.
Step 3: Use the emnify REST API to get the device details
After generating your authentication token, you need to determine which device your SIM card is assigned to in the emnify platform. You can figure this out with the List Endpoints API call and use the ICCID value to filter the results.
To filter the results, use the q query parameter in the <field>:<criteria> format.
The request parameters in Jira automations must be URL-encoded using smart values.
Because you previously set a condition to ensure the custom ICCID field isn’t empty, you can use the smart value {{issue.ICCID}}.
Add a Send web request action and configure the fields as follows:
- Web request URL -
https://cdn.emnify.net/api/v1/endpoint?q=iccid:{{issue.ICCID}} - HTTP method - GET
- Web request body - Empty, as the URL handles the filtering.
- Select Delay execution of subsequent rule actions until we’ve received a response for this web request. Alternatively, you can continue running the rule and set up error handling.
- Headers - Insert
Content-TypeandAuthorizationas Keys and add the respective Valuesapplication/jsonandBearer {{authToken}}. Make sure there’s a non-breaking space betweenBearerand{{authToken}}.
The response contains device information that you’ll use in subsequent actions. See List Endpoints in the emnify documentation for more details about the response structure and examples.
Step 4: Comment on the issue with the device and SIM status
Once you have the corresponding device details, you can use the {{webhookResponse}} smart values to write a comment on the issue.
- Add a Comment on issue action.
- Write a comment referencing the device and SIM status from the response of the previous web request.
- Select Prevent duplicates by only adding this comment once to a particular issue. You want to add the comment only once per issue.
- Select the Comment Visibility (either Internal only or Share with customer).
The following is an example comment that includes links to the relevant documentation:
Step 5: Use the emnify REST API to get the connectivity status
Now that you know the device ID, you can pull the current connectivity status of the device using the Endpoint Connectivity Status API call.
Instead of using an issue value in the web request URL (for example, {{issue.ICCID}}), you want to use data from the previous web request’s response.
Add a Send web request action, then configure the fields as follows:
- Web request URL -
https://cdn.emnify.net/api/v1/endpoint/{{webhookResponse.body.id}}/connectivity - HTTP method - GET
- Web request body - Empty
- Select Delay execution of subsequent rule actions until we’ve received a response for this web request. Alternatively, you can continue running the rule and set up error handling.
- Headers - Insert
Content-TypeandAuthorizationas Keys and add the respective Valuesapplication/jsonandBearer {{authToken}}. Make sure there’s a non-breaking space betweenBearerand{{authToken}}.
See Endpoint Connectivity Status in the API reference for more information on the response structure and possible statuses.
Step 6: Edit the existing comment with the connectivity status
Finally, update the comment you added to the issue with the current connectivity status for your team to reference.
Add an Edit comment action, then configure the fields as follows:
- Comment to edit - Last comment (the comment you created).
- Comment - Add the connectivity status from the response of the web request.
- Comment Visibility - Defaults to Existing Visibility because you’re editing an existing comment.
The following is an example comment that uses {{currentComment}} to include the existing content and add the connectivity status with links to the relevant documentation:
Step 7: Define the rule details and turn it on
For this rule to run, you need to define the rule details and then turn it on. For more information on the different rule details you can edit and what they mean, see What are rule details in Atlassian Automation?
Add a Name for your rule (for example, Fetch Current Device and SIM Statuses). Optionally, add a Description to explain the rule’s purpose.
Choose an Actor. The selected user performs the actions defined in the rule. Automation for Jira is the default actor and is recommended because it makes it clear to your team that this is an automated process.
You should see an Enabled badge next to the rule name when the rule has been successfully turned on and is active.
Once active, this rule generates a comment on the issue with the device, SIM, and connectivity status when an issue is created.
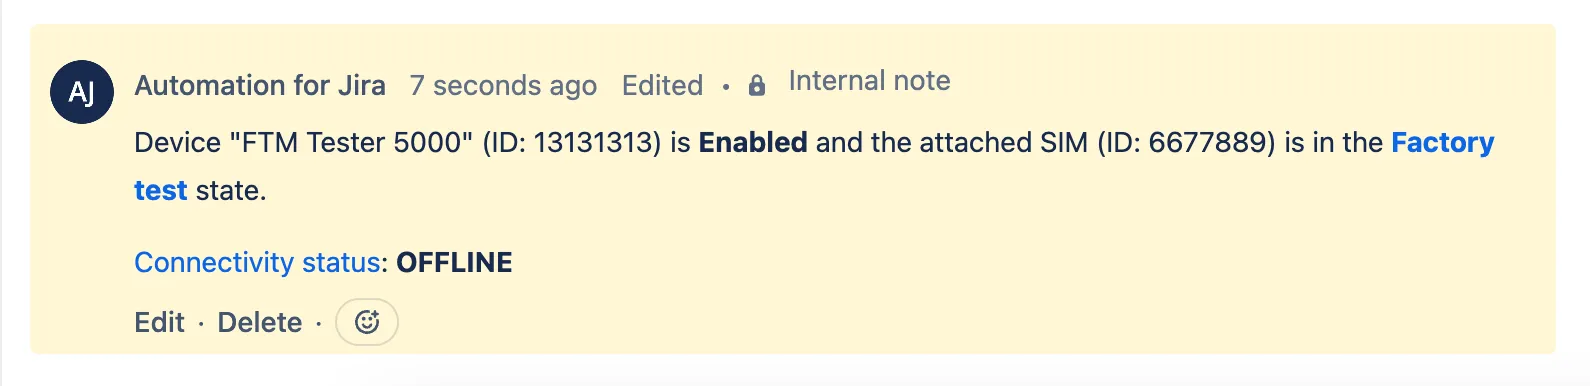
Create a manual trigger to reset connectivity
Often, while troubleshooting, you need to reset the device’s connectivity. You can create a rule manually triggered by your team from the Actions on any issue to reset the connectivity using the emnify REST API.
Step 1: Set up the trigger and conditions
You don’t need to select Prompt for input when this rule is triggered because you should have all the information required to reset the connectivity.
Step 2: Generate an authentication token for the emnify REST API
This API path has a rate limit of 100 requests per IP in a 5-minute window. For more information, see Rate limits.
Add the Send web request action and configure the fields as follows:
-
Web request URL -
https://cdn.emnify.net/api/v1/authenticate -
HTTP method - POST
-
Web request body - Select Custom data then add the following JSON payload:
-
Select Delay execution of subsequent rule actions until we’ve received a response for this web request. Alternatively, you can continue running the rule and set up error handling.
-
Headers - Insert
Content-Typeas a Key and addapplication/jsonas the respective Value.
The response contains the auth_token you’ll use to authenticate further requests.
See Retrieve Authentication Token in the emnify documentation for more details about the response structure and examples.
Because this automation requires multiple calls to the emnify REST API, you also need to store the auth_token as a variable.
Creating a variable saves a smart value as a semantic name that you can use in other actions or conditions within this rule.
Add a Create variable action, then configure the fields as follows:
- Variable name -
authToken - Smart value -
{{webhookResponse.body.auth_token}}
The authentication token is now stored in the {{authToken}} variable for future use.
Step 3: Use the emnify REST API to get the device details
Add a Send web request action and configure the fields as follows:
- Web request URL -
https://cdn.emnify.net/api/v1/endpoint?q=iccid:{{issue.ICCID}} - HTTP method - GET
- Web request body - Empty, as the URL handles the filtering.
- Select Delay execution of subsequent rule actions until we’ve received a response for this web request. Alternatively, you can continue running the rule and set up error handling.
- Headers - Insert
Content-TypeandAuthorizationas Keys and add the respective Valuesapplication/jsonandBearer {{authToken}}. Make sure there’s a non-breaking space betweenBearerand{{authToken}}.
The response contains device information that you’ll use in subsequent actions. See List Endpoints in the emnify documentation for more details about the response structure and examples.
The requests in this automation have varied response formats, so you must also store the device ID as a variable.
Add a Create variable action, then configure the fields as follows:
- Variable name -
deviceID - Smart value -
{{webhookResponse.body.id}}
The device ID is now stored in the {{deviceID}} variable for future use.
Step 4: Use the emnify REST API to reset the connectivity
Next, use your {{deviceID}} variable to execute the Reset Endpoint Connectivity API call.
Add a Send web request action, then configure the fields as follows:
- Web request URL -
https://cdn.emnify.net/api/v1/endpoint/{{deviceID}}/connectivity - HTTP method - PATCH
- Web request body - Empty
- Select Delay execution of subsequent rule actions until we’ve received a response for this web request. Alternatively, you can continue running the rule and set up error handling.
- Headers - Insert
Content-TypeandAuthorizationas Keys and add the respective Valuesapplication/jsonandBearer {{authToken}}. Make sure there’s a non-breaking space betweenBearerand{{authToken}}.
The response is empty when successful. See Reset Endpoint Connectivity in the emnify documentation for dispatch options.
Step 5: Comment on the issue with the reset status
- Add a Comment on issue action.
- Write a comment stating that reset connectivity has been triggered. This comment appears while the rule retrieves the current connectivity status.
- Select Prevent duplicates by only adding this comment once to a particular issue. You want to add the comment only once per issue.
- Select the Comment Visibility (either Internal only or Share with customer).
The following is an example comment:
Step 6: Use the emnify REST API to get the connectivity status
When reset connectivity is triggered, the device detaches from the network and waits for the modem to connect again. Depending on the device and network conditions, this process can take a few seconds to a few minutes. By default, this action runs immediately after the comment is added to the issue, so the connectivity status fetched in this action may not be accurate unless you add a delay (possible with a Premium or Enterprise plan).
Add a Send web request action, then configure the fields as follows:
- Web request URL -
https://cdn.emnify.net/api/v1/endpoint/{{webhookResponse.body.id}}/connectivity - HTTP method - GET
- Web request body - Empty
- Select Delay execution of subsequent rule actions until we’ve received a response for this web request. Alternatively, you can continue running the rule and set up error handling.
- Headers - Insert
Content-TypeandAuthorizationas Keys and add the respective Valuesapplication/jsonandBearer {{authToken}}. Make sure there’s a non-breaking space betweenBearerand{{authToken}}.
See Endpoint Connectivity Status in the API reference for more information on the response structure and possible statuses.
Step 7: Edit the existing comment with the connectivity status
Finally, you need to update the existing comment with the connectivity status for your team to reference.
Add an Edit comment action, then configure the fields as follows:
- Comment to edit - Last comment (the comment you created).
- Comment - Add the connectivity status from the response of the web request.
- Comment Visibility - Defaults to Existing Visibility because you’re editing an existing comment.
The following is an example comment that replaces the existing comment completely and includes the connectivity status with links to the relevant documentation:
Step 8: Define the rule details and turn it on
Add a Name for your rule (for example, Reset Connectivity). Optionally, add a Description to explain the rule’s purpose.
Choose an Actor. The selected user performs the actions defined in the rule. Automation for Jira is the default actor and is recommended because it makes it clear to your team that this is an automated process.
You should see an Enabled badge next to the rule name when the rule has been successfully turned on and is active.
Once active, the rule is visible from Actions on the defined issues.
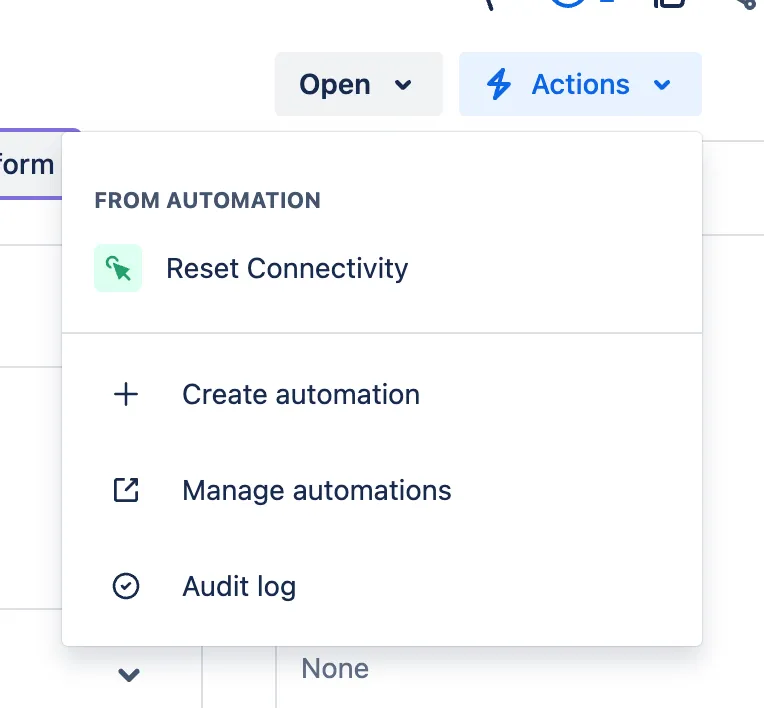
After it’s triggered, this rule generates a comment on the issue indicating a successful reset and the current connectivity status.
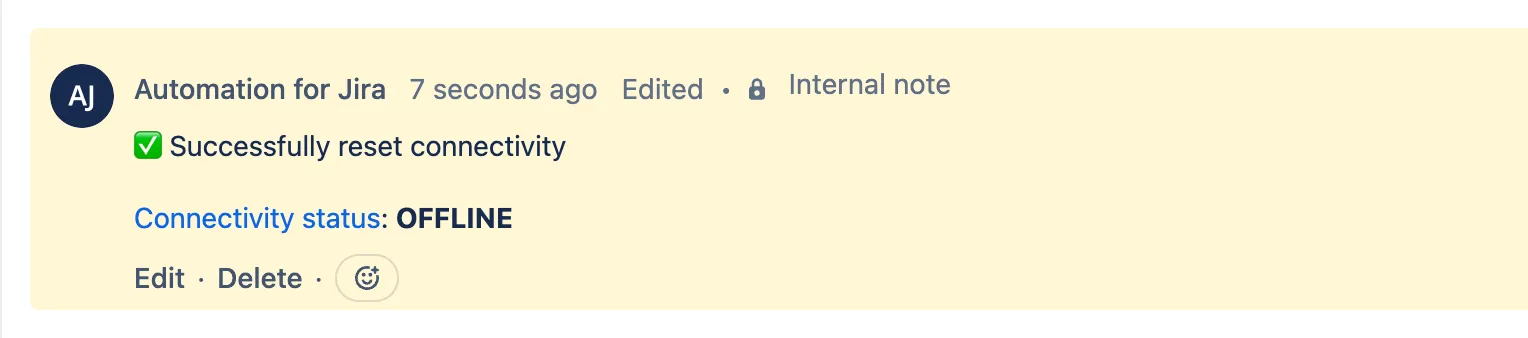
Create a manual trigger to get the connectivity status
You can also add a manual trigger to fetch a device’s current connectivity status. Setting up this rule follows a similar process to the manual trigger to reset connectivity but with a few changes.
Step 1: Set up the trigger and conditions
You don’t need to select Prompt for input when this rule is triggered because you should have all the information required to get the connectivity status.
Step 2: Generate an authentication token for the emnify REST API
This API path has a rate limit of 100 requests per IP in a 5-minute window. For more information, see Rate limits.
Add the Send web request action and configure the fields as follows:
-
Web request URL -
https://cdn.emnify.net/api/v1/authenticate -
HTTP method - POST
-
Web request body - Select Custom data then add the following JSON payload:
-
Select Delay execution of subsequent rule actions until we’ve received a response for this web request. Alternatively, you can continue running the rule and set up error handling.
-
Headers - Insert
Content-Typeas a Key and addapplication/jsonas the respective Value.
The response contains the auth_token you’ll use to authenticate further requests.
See Retrieve Authentication Token in the emnify documentation for more details about the response structure and examples.
Because this automation requires multiple calls to the emnify REST API, you also need to store the auth_token as a variable.
Creating a variable saves a smart value as a semantic name that you can use in other actions or conditions within this rule.
Add a Create variable action, then configure the fields as follows:
- Variable name -
authToken - Smart value -
{{webhookResponse.body.auth_token}}
The authentication token is now stored in the {{authToken}} variable for future use.
Step 3: Use the emnify REST API to get the device details
Add a Send web request action and configure the fields as follows:
- Web request URL -
https://cdn.emnify.net/api/v1/endpoint?q=iccid:{{issue.ICCID}} - HTTP method - GET
- Web request body - Empty, as the URL handles the filtering.
- Select Delay execution of subsequent rule actions until we’ve received a response for this web request. Alternatively, you can continue running the rule and set up error handling.
- Headers - Insert
Content-TypeandAuthorizationas Keys and add the respective Valuesapplication/jsonandBearer {{authToken}}. Make sure there’s a non-breaking space betweenBearerand{{authToken}}.
The response contains device information that you’ll use in subsequent actions. See List Endpoints in the emnify documentation for more details about the response structure and examples.
Step 4: Use the emnify REST API to get the connectivity status
Add a Send web request action, then configure the fields as follows:
- Web request URL -
https://cdn.emnify.net/api/v1/endpoint/{{webhookResponse.body.id}}/connectivity - HTTP method - GET
- Web request body - Empty
- Select Delay execution of subsequent rule actions until we’ve received a response for this web request. Alternatively, you can continue running the rule and set up error handling.
- Headers - Insert
Content-TypeandAuthorizationas Keys and add the respective Valuesapplication/jsonandBearer {{authToken}}. Make sure there’s a non-breaking space betweenBearerand{{authToken}}.
See Endpoint Connectivity Status in the API reference for more information on the response structure and possible statuses.
Step 5: Comment on the issue with the connectivity status
Use the {{webhookResponse}} smart values to write a comment on the issue.
- Add a Comment on issue action.
- Write a comment referencing the connectivity status from the response of the previous web request.
- Select Prevent duplicates by only adding this comment once to a particular issue. You want to add the comment only once per issue.
- Select the Comment Visibility (either Internal only or Share with customer).
The following is an example comment that includes links to the relevant documentation:
Step 6: Define the rule details and turn it on
Add a Name for your rule (for example, Get Connectivity Status). Optionally, add a Description to explain the rule’s purpose.
Choose an Actor. The selected user performs the actions defined in the rule. Automation for Jira is the default actor and is recommended because it makes it clear to your team that this is an automated process.
You should see an Enabled badge next to the rule name when the rule has been successfully turned on and is active.
Once active, the rule is visible from Actions on the defined issues.
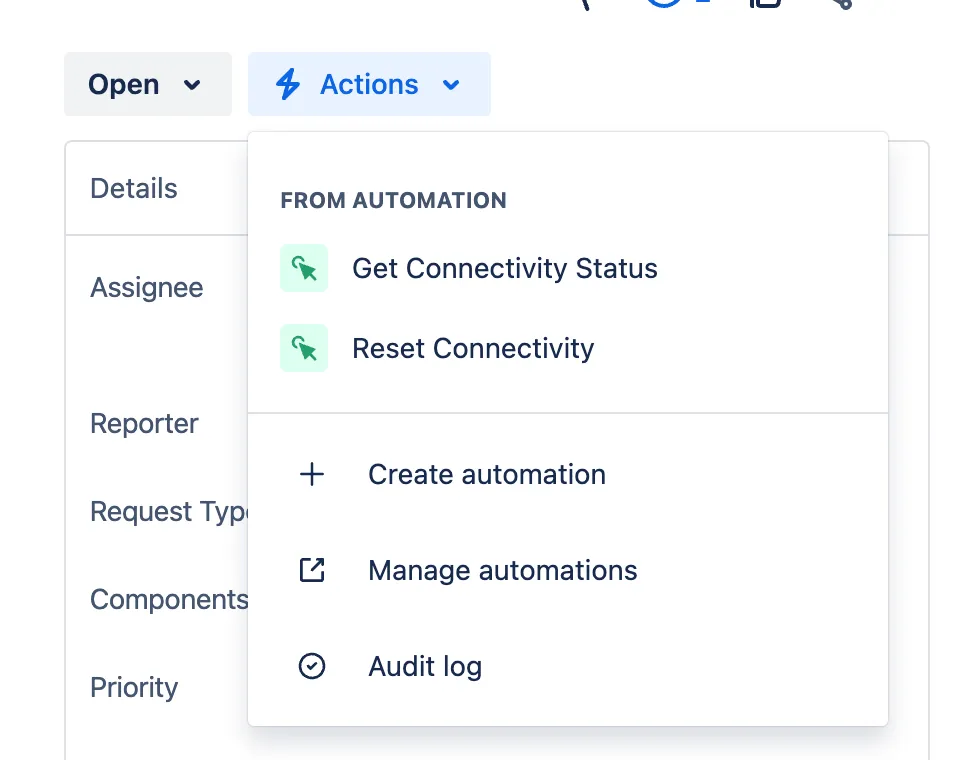
After it’s triggered, this rule generates a comment on the issue with the current connectivity status
