Use the GraphiQL IDE
There’s an in-browser emnify GraphiQL IDE where you can experiment with the GraphQL API.
Similar to OpenAPI in the REST world, GraphiQL (pronounced “graphical”) helps you accurately structure and validate queries, then run them directly against the server endpoint. It’s equipped with tools to help you try out the GraphQL API. Notable features include autocompleting, syntax highlighting, interactive documentation, and schema explorers.
If you’re new to GraphQL, visit the official GraphQL documentation to familiarize yourself with how the query language is structured.
Navigate the interface
The UI is divided into three parts:
- Sidebar where you can open plugin panes and change settings
- Left panel where you write your queries
- Right panel where the results of your queries are displayed
At the top of the sidebar, there are buttons for the documentation explorer, history, and GraphiQL explorer. Underneath, the sidebar shows buttons that allow you to re-fetch the GraphQL schema, see the keyboard shortcuts, and change settings.
The bottom of the left panel has two sections, Variables and Headers. By default, there’s a placeholder for the Authorization header.
When you type queries into this side of the screen, the IDE provides autocomplete based on the current GraphQL type schema and live syntax and validation error highlighting.
An example GraphQL query might look like this:
GraphQL queries typically start with a { character.
Lines that start with a # are ignored.
Authorization
To make calls from this IDE, you need to provide an authentication token in the Headers section.
Retrieve your authentication token
Use the emnify REST API to retrieve your authentication token. For step-by-step instructions, see Authenticate with application tokens.
Add your authentication token to GraphiQL
Once you have your authentication token, you need to pass that token to the GraphiQL IDE.
Navigate to the emnify GraphiQL IDE
To test that you’re authorized, click the Execute query button (▶️) and check your result.
Execute your first query
GraphiQL’s interactive documentation is used throughout this example.
To follow along, click the Show Documentation Explorer button in the sidebar.
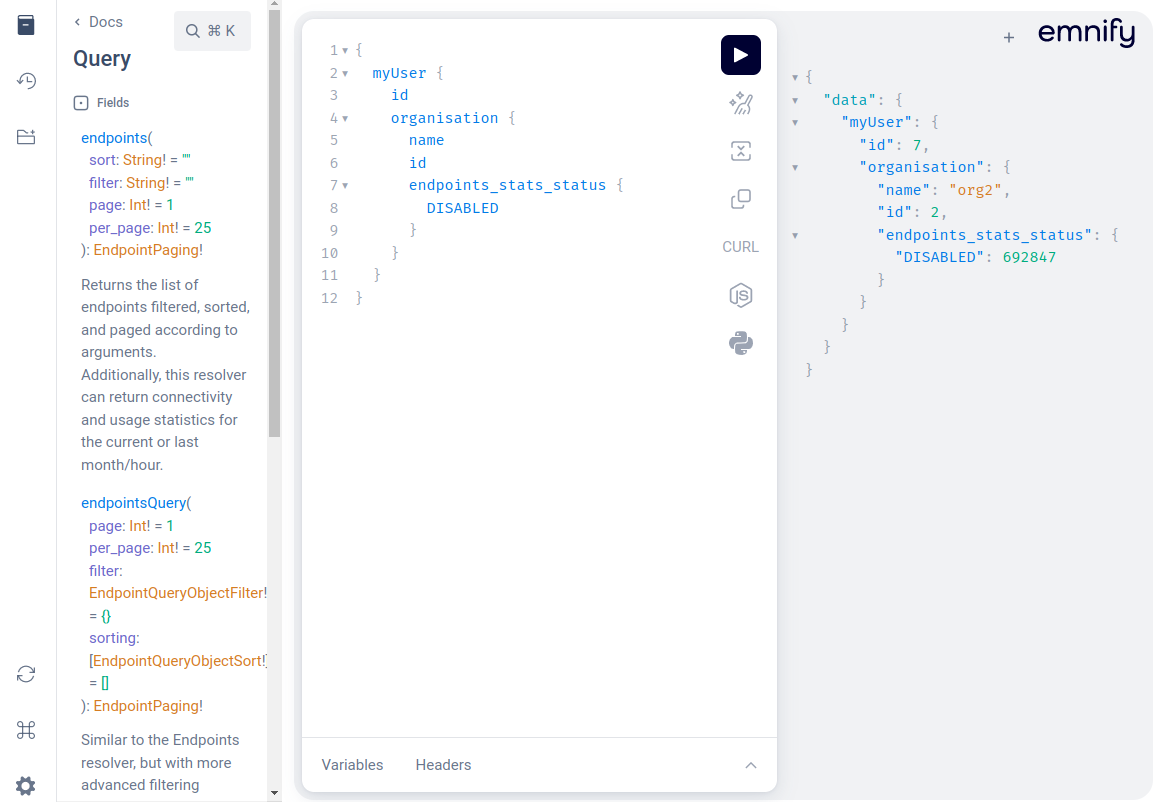
Once the Docs are visible, choose Query, then select myUser.

When you first visit the GraphiQL IDE, there’s a pre-populated example query in the left panel:
In this example, myUser is a query that can return your user and organization details, including endpoint (device) status and active tariff plan (data plan).

In GraphQL, the ! means that variable definition is required.
Within myUser, User is listed as a required object type and indicates which fields you can use in this query.
Because User is the only type available, you don’t need to type it out explicitly.

This example uses the organisation field, which requires the Organisation object type.
You want to receive the name and id fields from that object type.

Finally, when you execute the query, it returns a data object with your requested information.

Write your own query
Remove any content in the left panel and begin typing:
Inside the curly braces, you can start typing or use the keyboard shortcuts to open the autocomplete window.
In the following example, the IDE suggests endpoint, endpoints, and endpointsQuery once you’ve started typing “end”:

If you need help with what to write, click the Show GraphiQL Explorer button on the sidebar.

This displays an interactive overview of the current GraphQL schema. Open and select your desired fields, and the query builds and formats itself automatically.

To see the queries you’ve executed during a session, click the Show history button on the sidebar.

Generate code from your query
On the left panel are buttons allowing you to generate a cURL query, Node.js code, or Python code from your GraphQL query. Click these buttons to copy this code to your clipboard.

The following examples show code generated from the default query: