Connected Devices
Connected Devices is where you manage your devices.
View your devices
The Connected Devices page displays a list of all your devices. You can tailor the table to your specific workflow using Table settings.

This new approach replaces the previous Plain and Extensive views, giving you a single, flexible interface to manage your devices more effectively. For more information, see Customize tables in the emnify Portal.
Available columns
For each device, click anywhere on the table row to open the device details.
Quick actions
When you hover over a device, buttons appear to trigger quick actions.
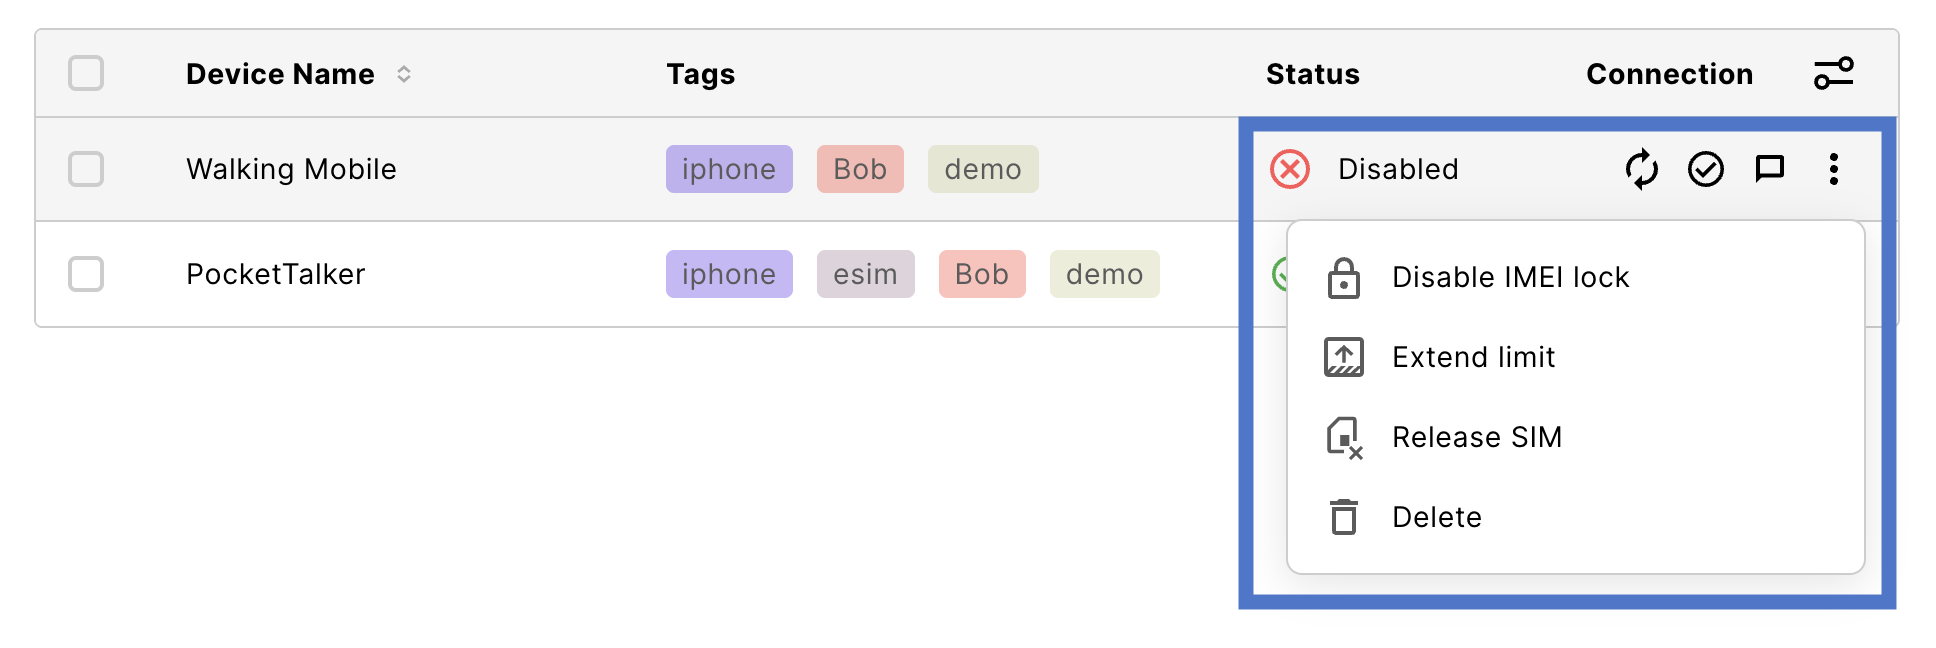
The following actions are available:
Create a new device
As part of the SIM registration process, you can create a new device for the newly registered SIM while still in the SIM registration dialog.
To create a new device to be used with an unattached SIM, navigate to Connected Devices and select Add device. After providing a name for the new device and selecting device policies, you can select a SIM from the list of registered, unassigned SIMs or filter for a specific SIM under Assign SIM (optional).
Get your device online
For information about configuring a device for network connectivity, see Configure the APN.
Filter devices
Filters allow you to query devices based on one or more properties (for example, assigned tags or the device ID). For more information and available filters, see Filter tables in the emnify Portal.
Search devices
The Connected Devices search bar is under the page title next to the filters. For more information and searchable fields, see Search tables in the emnify Portal.
Tag devices
Tags help you organize and filter devices in Connected Devices. They can be added when creating a new device, from the device details page, or through bulk actions in the device list.
Naming conventions
- Minimum length: 2 characters
- Maximum length: 150 characters
- Allowed characters: Uppercase and lowercase English letters, digits, and the following:
- _ . + - Names cannot begin with a space (leading whitespace is trimmed)
- Maximum of 30 tags per device
Tag behavior
Hierarchy and display: On the Connected Devices table and device details page, tags are displayed alphabetically (A-Z), case insensitive. When managing tags, all tags in your Workspace appear in the dropdown list. By default, tags in this list are sorted by usage frequency in descending order unless manually reordered. If two tags have the same usage count, they are sorted alphabetically (A-Z), case insensitive.
Search: If your Workspace has more than 15 tags, a search bar appears with suggestions for existing tags. When searching, tags used by the selected devices always appear at the top of the results.
Error handling: You’re notified if limits are reached (for example: maximum tags in Workspace, duplicate names, disallowed characters, or too many tags per device). If a device has reached the maximum tag limit, checkboxes in the popover are disabled.
Click filtering: Clicking on a tag in the device table triggers a filter and updates the view to show only devices that use that tag.
Advanced filtering: The tag filter popover includes an Exact match toggle:
- When switched on, only devices with all selected tags are shown.
- When switched off, devices with any of the selected tags are shown.
Where tags are available
Tags can be added, removed, or managed in multiple areas of the Portal:
- Connected Devices:
From the device list (via bulk actions) or when creating a new device. - Device Details:
Clicking any tag or the Add tag option opens the tag management popover. - SIM Inventory:
When assigning a device to a SIM.
Tag deletion logic
- Unused tags (not applied to any device) can be deleted immediately.
- In-use tags (applied to one or more devices) require confirmation in a modal before deletion.
Get device information
To view all information about a device, navigate to Connected Devices, find it in the list, and click anywhere on the table row to open the device details.
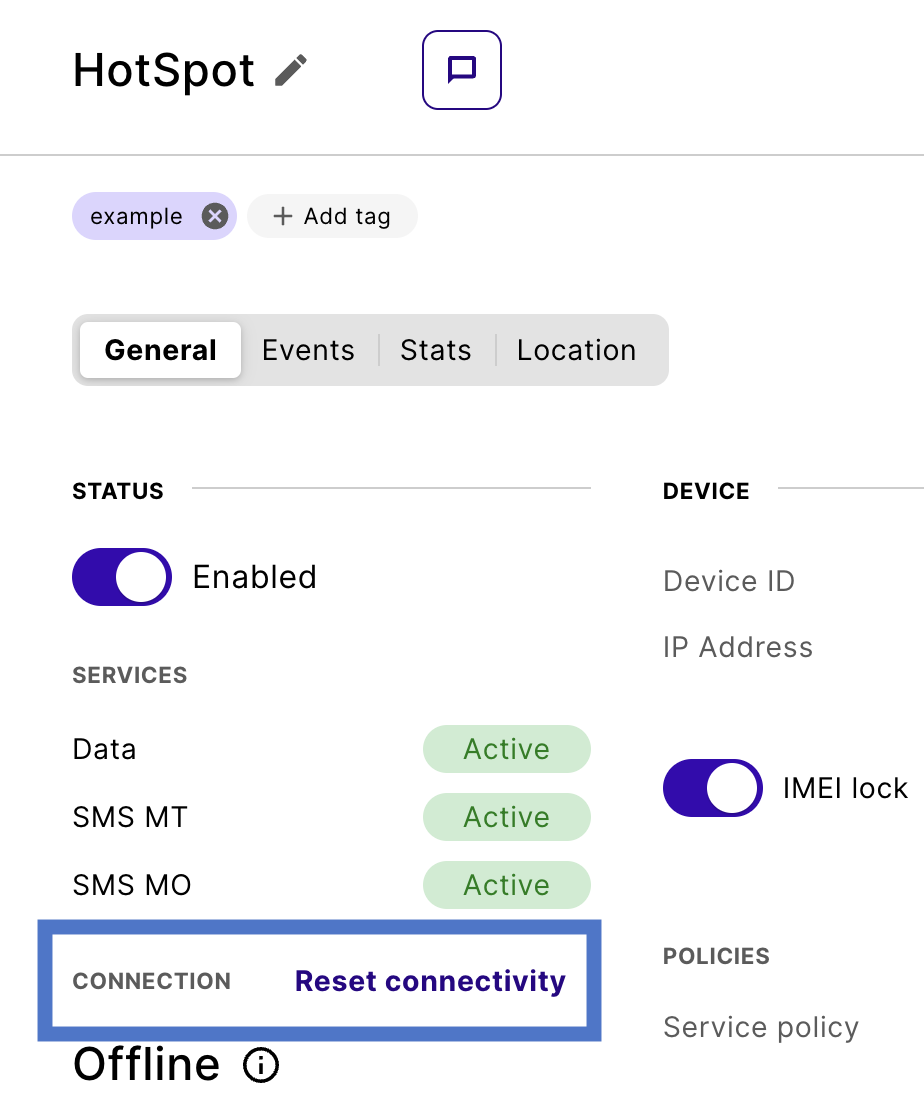
It opens to the General tab by default. General shows the following properties:
For definitions of any unfamiliar terms or acronyms, see the IoT glossary.
Device status
Configure the device status
A device has only two configurable states, Enabled or Disabled. You can toggle one or more devices between these states to control their data usage. To change the status of a single device, use quick actions. For multiple devices, use the enable or disable devices bulk action.
If you’re using the emnify REST API to configure devices, it’s possible to have a Disabled endpoint with an Activated assigned SIM. In this case, you continue to accrue costs as emnify charges for activated SIMs. Be sure to suspend the assigned SIM to avoid unexpected charges.
Reference: Endpoint Object and Endpoint API
Reset connectivity
You can reset a device’s connectivity by selecting its Reset connectivity icon while viewing it in the list of Connected Devices or in device details: General tab > Status column > Connection > Reset Connectivity.
Show where this happens in the Portal

Bulk actions
You can also perform bulk actions on a group of devices.
Enable or disable devices
Use a filter to display a list of the targeted devices. Once their checkboxes indicate that they have been selected, the bulk actions menu bar appears at the top of the screen. Select Device and then one of the actions:
- Enable Devices
- Disable Devices
Rename devices
To rename multiple devices, see Rename devices in bulk.
Release SIMs
To release SIMs from multiple devices, see Release SIMs from devices in bulk.
Delete devices and SIMs
On Connected Devices, you can delete devices and, optionally, their associated SIMs using the bulk action menu. This feature helps keep your inventory organized and to ensure that unused SIMs don’t generate unnecessary signaling or costs.
When you select devices for deletion, a dialog prompts you to confirm whether you want to delete both the device and its SIM, delete only the device (leaving the SIM in your SIM Inventory), or cancel the operation. If you choose to delete the SIM, you permanently remove it from your account—this stops all signaling from the SIM and makes it unusable for any future network access.
Add or remove tags
Bulk tag management lets you add or remove tags from multiple devices at once. This feature helps keep your deployment organized and reduces unused or outdated tagging structures.
The option to remove tags is only visible if at least one selected device already has tags. Additional considerations when removing tags:
- Only tags currently applied to the selected devices are displayed in the removal dialog.
- By default, no tags are preselected—you must manually select the tags to remove.
- After confirmation, the selected tags are removed from all chosen devices.
- If a tag is removed from its last associated device, it becomes an unused tag and can then be deleted without confirmation.
For step-by-step instructions, see Manage device tags.