

Assign EIDs to eSIM profiles
Assigning an EID binds an eSIM profile to one specific device on the emnify SM-DP+.
After that, your MDM downloads the profile by sending only the emnify RSP URL https://rsp-3128.idemia.io.
The download needs no activation code, and the person holding the device does nothing.
That’s what makes this route work for a fleet. You assign the EIDs once in the emnify Portal, then your MDM pushes a single command to every device.
Before you begin
At checkout, choose an eSIM profile installation method. This choice determines how you get each profile onto a device, and what the order download contains.
- I will use activation codes: you receive a QR code, universal link, or numeric code to install each profile.
- I will link profiles using the EID: you link profiles by entering device EIDs individually or in bulk.
The order download follows this choice. With activation codes, the CSV contains the ICCID, activation code, and Apple Universal Link for each profile. With EID linking, the CSV contains the ICCID only. QR code images are never included in an order download. Retrieve them per device from the eSIM tab in Connected Devices.
For EID assignment, select I will link profiles using the EID.
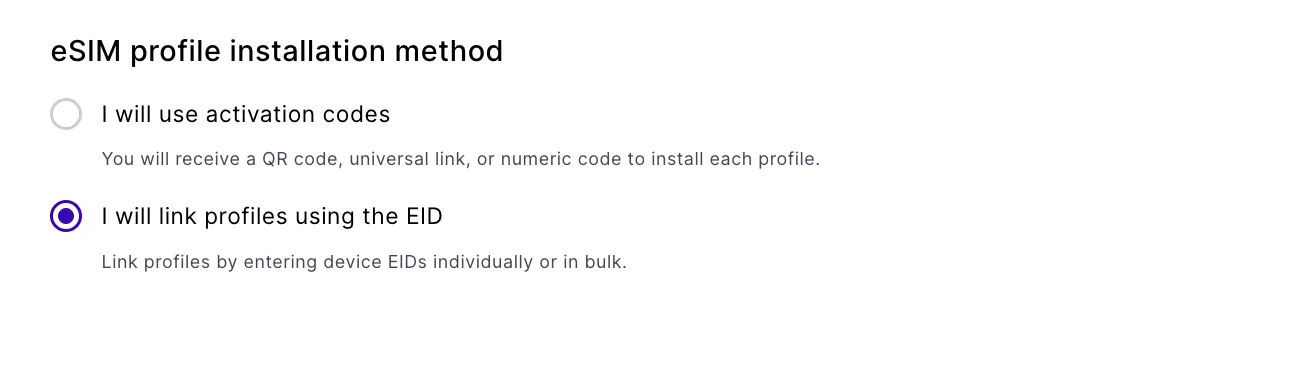
Assignment works only on profiles you ordered for EID linking. If you selected I will use activation codes instead, you can still open the assignment dialog, but the assignment fails. In that case, install the profiles with an activation code, or order new profiles for EID linking.
You also need:
- eSIM profiles in status Available. Only these are eligible for assignment.
- The EID of every device you want to provision.
A device carries its EID on the packaging or the barcode sticker. On Apple devices you can also read it under Settings > Info. For a fleet, export the EIDs of your enrolled devices from your MDM. Refer to your MDM documentation for the export steps.
Assign an EID to a single device
In Connected Devices, find and click the device.
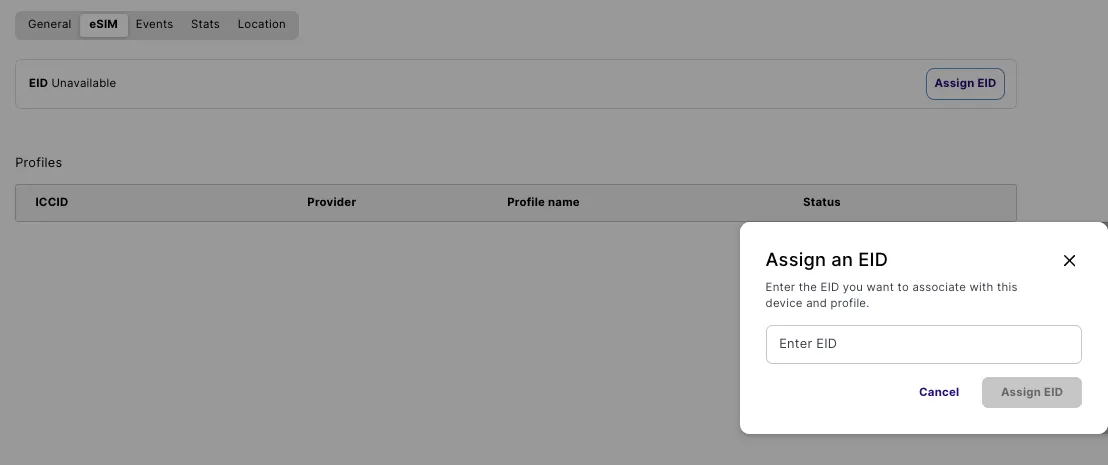
The profile shows Linked while the assignment is processing, then moves to Ready to download. Your MDM can download only profiles in Ready to download status.
Assign EIDs in bulk
For more than a handful of devices, upload a CSV file of EIDs instead of assigning them one at a time.
Create a CSV file with one EID per row.
Please note the following limits:
- Maximum lines: 10,000, one EID per line
- Maximum row length: 100 characters
- Maximum file size: 400 KB
You can skip this step and click Download example CSV in the dialog to get a correctly formatted template.
In Connected Devices, click the three-dot menu (⋮) next to Add device, then select Assign EIDs to eSIM profiles.
In the Assign profiles to devices dialog, select the eSIM product you want to assign from.
The Available profiles count above the selector shows how many profiles that product currently has ready. If you have fewer available profiles than EIDs in your file, you’re prompted to order more before continuing.
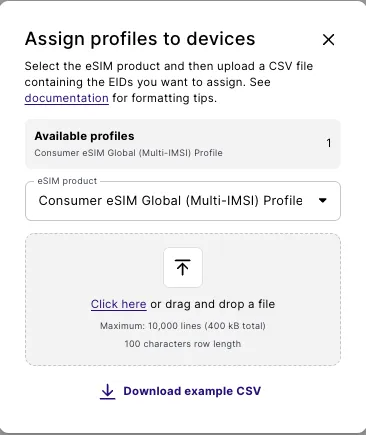
The eSIM product selector lists only the products that support EID assignment in the Portal. If a product you expect is missing, contact emnify Support.
A bulk assignment doesn’t complete immediately. When it completes, you can download a CSV of any failed EIDs with the reason for each failure. The profiles show Linked while the assignment is processing, then move to Ready to download.
Find the devices you assigned
After a bulk assignment, reuse the same CSV file to narrow Connected Devices to the devices you provisioned.
In Connected Devices, select Add Filter, then choose EID.
The table now lists only the devices for those EIDs, and the filter shows the count. The filter accepts the same file size and row limits that the assignment accepts, so one file serves both steps. For the plain-text alternative, see Filter table contents.
With the devices filtered, you can rename them in one pass. See Rename devices in bulk.
Record which profile each device received
emnify matches each EID in your file to a profile from your available pool. You don’t choose which profile a given device receives, and the Portal doesn’t report the pairing back to you.
To keep a durable record of which ICCID reached which EID, export the SIM list report.
It carries an eid and an iccid column for every SIM in your account.
For instructions, see SIM list.
Correct a wrong assignment
You can undo an assignment yourself for as long as no device has downloaded the profile. Check the eSIM profile status in Connected Devices first.
Once the profile shows Ready to download, the eSIM tab shows the assigned EID and an Unassign EID button. Linked is only the brief transitional status while the emnify SM-DP+ completes the pairing, so wait for Ready to download.
In Connected Devices, find and click the device.
The profile returns to Available, and you can then assign the correct EID to it. There’s no limit on this cycle: a profile can move between Available and Ready to download as often as you need.
You can unassign only one device at a time, so there is no bulk equivalent of the CSV upload. To correct a large batch, contact emnify Support.
The download is the point of no return. Once a device has downloaded the profile, the EID can’t be unlinked and nobody can reassign it. Order a new profile instead.
Next steps
Your profiles are ready for your MDM to download. For platform-specific instructions, see:
- Integrate with Omnissa Workspace ONE UEM MDM
- Integrate with Microsoft Intune MDM
- Integrate with Jamf Pro
- Integrate with Applivery UEM
Other MDM platforms, including IBM MaaS 360, Acceleronix, and ManageEngine, also support this download route.