

Deploy the emnify Consumer eSIM Global on Applivery
This guide explains how to deploy and activate the emnify Consumer eSIM Global on Apple and Android devices managed with Applivery.
The two platforms use different provisioning mechanisms, so read this guide for the platform you deploy to:
- Apple devices use EID linking. You link the profile to the device EID in the emnify Portal, then Applivery sends a Refresh Cellular Plans command carrying the emnify SM-DP+ URL.
- Android devices use an activation code. You enter the activation code directly in Applivery when you send the Add eSIM command.
That difference starts at the order, not at activation, so decide which platforms you are provisioning before you order. If you deploy to both, order separately for each.
Step 1: Check device and OS compatibility
Apple devices
Make sure that:
- The device supports eSIM.
- Applivery manages the device, and it appears in the Devices inventory.
- The device has an active internet connection.
- You have the device EID.
Android devices
Make sure that:
- The device supports eSIM.
- The device runs Android 15 or later.
- The device includes Google Mobile Services.
- Applivery manages the device through Android Enterprise, and it appears in the Devices inventory.
- The device has an active internet connection.
Applivery’s remote eSIM management isn’t available for AOSP devices. For the current constraints, see Android remote commands and eSIM management in the Applivery documentation.
Step 2: Enroll your devices in Applivery
Enroll Apple devices
For organization-owned devices registered in Apple Business, use Automated Device Enrollment. At a high level, you configure Applivery as an MDM server in Apple Business, synchronize the devices, assign a device enrollment profile to them, and complete enrollment during Apple Setup Assistant. For the other options, see Apple enrollment methods.
If Automated Device Enrollment isn’t available, use profile-based manual enrollment:
Enroll Android devices
Applivery also supports Zero-touch and Smart Enrollment. For the full list, see Android enrollment in the Applivery documentation.
Step 3: Order eSIM profiles
Order your eSIM profiles in the SIM Shop using the regular ordering of SIMs. Select the eSIM profile product and choose how many profiles you need.
emnify creates a device for each eSIM profile you order and assigns the profile to it. This happens for every eSIM profile order, whether the profile is provisioned on a Consumer (SGP.22) or Advanced (SGP.32) eUICC, and whichever installation method you choose.
Your eSIM profiles become available once the order status changes to Delivered.
At checkout, choose an eSIM profile installation method. This choice determines how you get each profile onto a device, and what the order download contains.
- I will use activation codes: you receive a QR code, universal link, or numeric code to install each profile.
- I will link profiles using the EID: you link profiles by entering device EIDs individually or in bulk.
The order download follows this choice. With activation codes, the CSV contains the ICCID, activation code, and Apple Universal Link for each profile. With EID linking, the CSV contains the ICCID only. QR code images are never included in an order download. Retrieve them per device from the eSIM tab in Connected Devices.
This is the step where the two platforms diverge:
- For Apple devices, select I will link profiles using the EID. You link the profile to the device EID in the emnify Portal, so the download needs no activation code.
- For Android devices, select I will use activation codes. Applivery’s Add eSIM command takes an activation code.
Your choice is per order and decides which route the profiles support. If you deploy to both platforms, place a separate order for each.
Step 4: Prepare the eSIM for activation
Apple: assign the device EID
Assign the EID of each Apple device to an eSIM profile, so Applivery can trigger the download without an activation code. For the full procedure, including bulk assignment from a CSV file, see Assign EIDs to eSIM profiles.
The profile moves to Ready to download once the assignment is processed. Applivery can download only profiles in that status.
Android: retrieve the activation code
Android doesn’t use EID linking. Retrieve the activation code for each profile instead, either from the order or from the device. For both routes, see Activate your eSIM using an activation code.
Step 5: Activate the eSIM via Applivery
Before you send either command, check that the device is powered on and connected to the internet. Applivery must also still manage it.
Activate an eSIM on an Apple device
Activate an eSIM on an Android-powered device
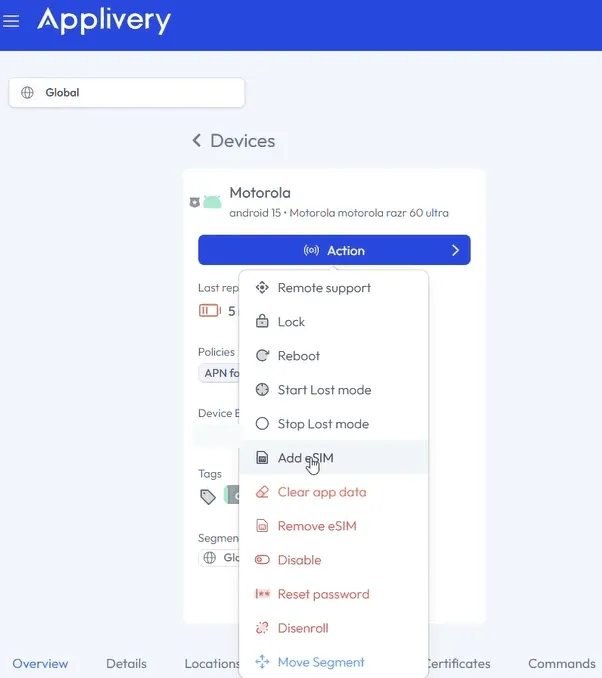
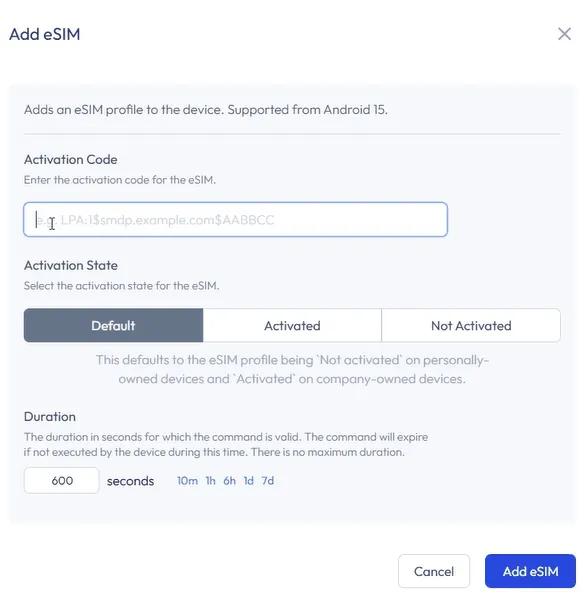
Applivery’s Android Add eSIM command carries the activation code in the eSIM provisioning request. For the API equivalent, see Create Android device command.
Step 6: Configure the APN on the device
After activation, the Access Point Name (APN) must be set to em.
For configuration instructions by device type, see Configure the APN.
You can also configure it through Applivery:
- Apple devices: attach an Apple configuration profile that contains the cellular settings to the applicable Apple policy, then assign that policy to the target devices.
- Android devices: remote APN configuration depends on the Android management capabilities and the OEM configuration available for the device. Applivery doesn’t document a universal Android workflow. See Android device management.
Once the APN is set, the device establishes data connection. You can verify by browsing the internet or streaming videos.